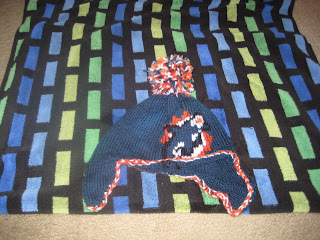
For those of you who aren't aware...there is a huge Dolphins fan in my life, and it was his birthday on February 3!! Jordan had requested a Miami hat a while ago, so I decided it would be the perfect birthday gift. I couldn't find a pattern for anything dolphin-related online (google fail!!!) so I had to start from scratch.
First, it was clear the hat needed to have earflaps. Jordan likes earflaps. Who doesn't like extra warm ears anyway? So this is what I did:
With BERNAT Satin yarn in teal, and size 6 round needles...
EARFLAP #1:
1:Cast on 5 stitches.
2 (and all even rows): Turn work, purl
3 (and all odd rows): k1f&b, k to last stitch, k1f&b
Continue until you have 19 st. Work 11 more rows. Cut threat, and make a second earflap. Don't cut the threat on the second earflap. I knit mine on round needles, and just kept the first earflap on the connecting part of the needles while I made the second one.
MAIN BODY OF HAT:
From the end of the second earflap, cast on 25 st. Knit across first earflap. Cast on 37 st, and join in the round with the second earflap. You should now have 100st!!! This was a little more wiggle room than normal, as I planned on having a fleece lining.
Knit in the round until you have about 5" from the top of the earflap.
DECREASING:
1: *k10, PM...repeat from * around
2 (and all even rows): knit and k2tg before each marker
3 (and all odd rows): knit
When you can't continue this anymore, take off the markers and k2tg all around. Pull the thread through the loops and tie off.
Now for the fun part!!! All the embellishments!!! To summarize, I made a pompom, a crocheted edge, the Miami Dolphins pattern, and the fleece insert. We'll look at each separately.
POMPOM:
I made a tricolour pompom with teal, white and orange (of course). To make a pompom, just take all three colours and wrap them around 3 or 4 fingers. When you have more than you think you will need, you are done. Tie them together perpendicular to the direction of wrapping, v
ery tightly. Then cut! See this
tutorial for pictures.
CROCHETED EDGE:
I used orange and white to travel around my edge. I switched colours every stitch. I learned how
here. It's a great idea for anything worked in stockinette stitch, because it stops it from curling up!!
PATTERN:
Ah, la pièce de résistance. I made this pattern in paint...colouring in each little square until it was just perfect. Maybe not the fastest way?? Haha...regardless, here it is:
Notice how the dolphin is the same colour as the hat...no need to embroider that part. Also, the grey = white on the hat. (I also added more orange to the helmet after...it looked better)
To add this to the front of the hat, I used this method of embroidery (from
here):
And for the one stitch for the eye, I used a French knot:
It took upwards of 5 hours (I made frequent catastrophic errors)...but it looked great in the end :)
Before I added the fleece insert, I blocked my hat.
This is how I block my hats.
FLEECE INSERT:
As I obviously had no idea how to do this part, I once again went to google and I found this
sweet blog! I also had very little skill in hand sewing, and it showed me how to do that too. I am now loaded with skills. For the earflaps I just added triangles on after....but next time I might just make the body of the hat longer and trim it to avoid more sewing. Yeay for extra warm hats!
 |
| Don't judge my stitching too harshly! |
My model <3:
 |
| Nothing better than a happy birthday boy! |


